Clouds live outside.
Clouds don't belong in indoor pictures. This was taken on stage just before read more
sets, photos
 10
PHOTOS
10
PHOTOS
10
PHOTOS
10
PHOTOS
10
PHOTOS
10
PHOTOS
10
PHOTOS
10
PHOTOS
10
PHOTOS
10
PHOTOS
10
PHOTOS
10
PHOTOS
I wouldn't want to carry a cast iron Dutch oven on a long hike. For this weekend, we didn't care about pack weight. Instead, we bought the best tools for the job.
I recently joined Hartley Brody and Mike Ewing for a weekend winter bushcraft workshop with Micah Surprenant. The first day Micah taught us how to build a shelter, harvesting wood from the forrest, and we built a long fire to keep us warm at night. We hiked in about 25 minutes from where we parked. This was private land, and not a protected state or national forrest. That ment we were free to cut down trees, build fires and make semi-permenant structures.
Bushcraft, in many ways, is the opposite of Leave No Trace principles. Instead it focuses on techniques used by woodsmen and frontiermen for generations.
Some people think of camping as roughing it. Bushcraft folks think of spending time in the woods as smoothing it. The craft part comes in as you learn to build shelters, and improve your campsite by making it more comfortable. A-frame chairs, lean-to's and benches can all be made from trees found in the area. This is less about survival training, and more about enjoying time in the outdoors.
Bushcraft has a different gear profile than what I usually think of as hiking and camping. Instead of ultra-light tents, stoves and freeze-dried food, we used canvas tarps and built a fire for cooking real food. Three main pieces of gear we focused on were the knife, hatchet and saw.
Knife - Scandanavian grind knives are easy to sharpen, and great for woodworking in the field. They have a single angle grind, so it's easy to keep consistant. Many knifes feature two angles of grind, which help keep the sharp edge longer. But, these aren't as easy to re-sharpen. Here's a good example of a scandanavian grind knife with a built-in fire starter.
Hatchet - Great for limbing trees, splitting logs and quick rough work. You can pick up a cheap axe from your local hardware store, and figure out what style you like. It's very popular with the bushcraft crowd to take old axe heads and add new handles to them. The older axe heads were designed to stand up to frequent use.
Saw - I like this classic folding saw. It folds up, hiding the blade for safe transport. Its stiff triangle deisgn makes for easier work cutting through trees and logs.
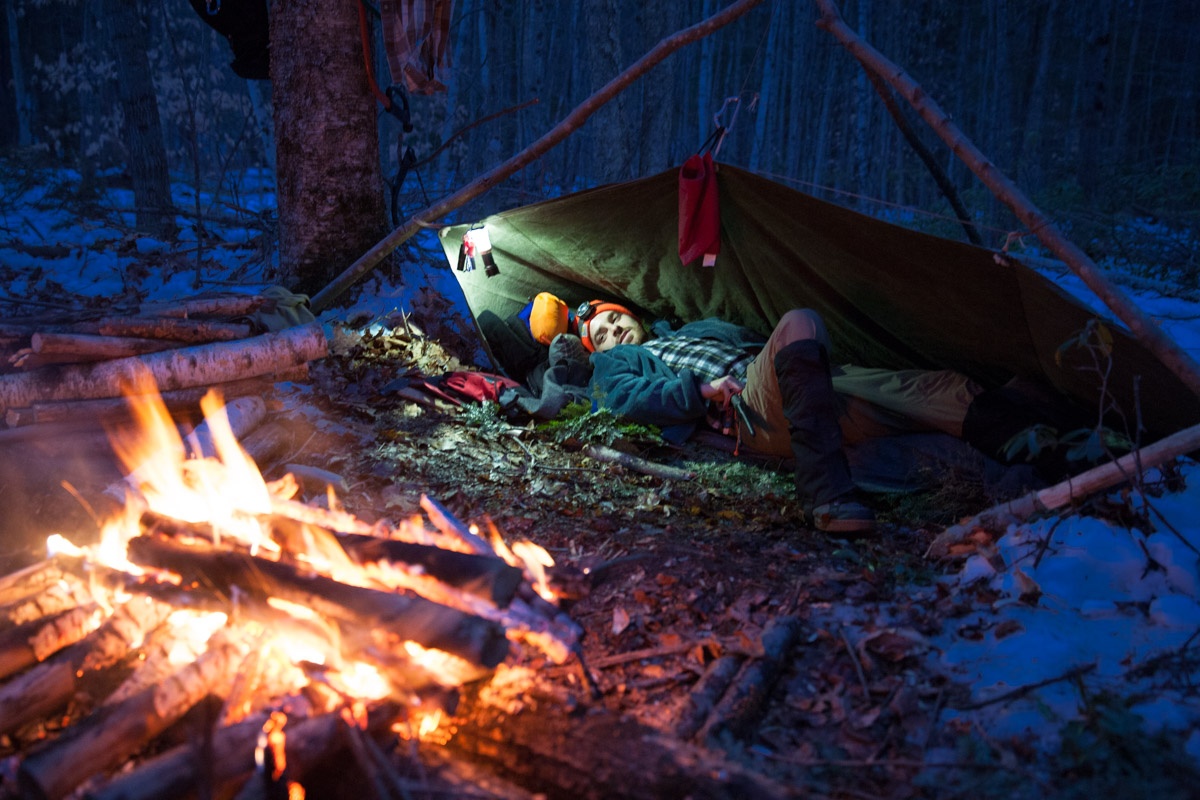
We built two main types of shelters, on each side of a planned long fire. The first shelter consisted of a tarp afixed on one end to a ridgeline pole, staked to the ground. Our ridgeline pole was wedged inbetween several trees, then anchored in place with forked branches. We secured the tarp at the top, and staked it down at a 45 degree angle. Instead of using regular tent stakes, we carved them out of silver-dollar sized branches. A tent stake has a point on one end, a rounded top on the other and a carved beak notch to catch the rope. On the back of the tarp we shoveled snow. This prevented a cold draft from blowing in the backside of the shelter.
The other shelter we built was a tripod shelter. A tripod roughly 4 feet high anchored the open side of the tarp shelter. The other sides of the tarp were staked down and piled with snow. The opening faced the long fire in the center to capture the radiating heat and provide a warm space to sleep.
To insulate us from the cold ground, we made browse beds from Hemlock boughs. You can also use Fir, Spruce or Pine bows. Pile a collection of those 2-3 of inches thick, and you have some a decent base for your sleep system. A wool blanket rests on top of the pile of boughs to protect sleeping pads and sleeping bags. The wool blankets also can be used to protect delicate sleeping gear from flying embers from the fire.
In 3 days, we built 12 fires. The most important one was the Long Fire between our shelters. This burned throughout the night, radiating heat into our shelters to keep us warm. We started with two logs, 6-8 inches in diameter. These were split lengthwise in half. Laid split side up, we piled them with tinder, kindling and some fuel branches. Once those were set ablaze, we cooked dinner and dried our socks. As the initial fuel burned down to a nice bed of coals, we topped it with the other halves of the split log. This choked the fire's air supply enough to let it burn slowly throughout the night.
Another fire we built was the Lunch Fire. This is small enough to heat water for a hot drink and perhaps cook a small meal. The goal is to only use enough fuel to acccomplish your task, without leaving partially burned wood. I can see trips in my future involving a small hike, a lunch fire and returning a few hours later refreshed from some time in nature.
Learning to find dry tinder and kindling in the woods is very valuable. If you're out in the rain and need to warm up, you need to know where to look. Fortunately for us, we were surrounded by many types of birch. Birch is great for fire starting. The bark makes excellent tinder, and is easy to identify. Here are a few examples of birch trees.

There's a rich history and culture around bushcraft springing up these days. You can learn more about it by following the#bushcraft hashtag on instagram, and finding some local guides to learn from. I think we could all benefit from spending a little more time in the woods.
See the full set of pictures from this Bushcraft winter workshop on flickr.
Our eventual campsite, before we start clearing it.

Saws and a look into the ridgeline shelter over the fire.

Cooking in cast iron over the long fire.


Clouds don't belong in indoor pictures. This was taken on stage just before read more
Inspired by The Rye Baker by read more
Love it or hate it, Pokemon Go is everywhere. If you hate it, then you're probably not reading this. You also don't care how to take better pictures within ... read more
Especially in job interviews. Their answer tells you a lot about their motivation for approaching problems and achieving ... read more
Comments