Clouds live outside.
Clouds don't belong in indoor pictures. This was taken on stage just before read more
sets, photos
 10
PHOTOS
10
PHOTOS
10
PHOTOS
10
PHOTOS
10
PHOTOS
10
PHOTOS
10
PHOTOS
10
PHOTOS
10
PHOTOS
10
PHOTOS
10
PHOTOS
10
PHOTOS

Mistakes can be valuable, as long as we learn from them. Time and experience help prevent experts from making mistakes. When experts do make mistakes, they know how to catch them before it's too late. In photography, its possible for an un-caught mistake to ruin a whole photoshoot. That's a big problem for events you can't re-create like sports photography or wedding photography. That's why it's good to trust an expert.
I'm not a woodworking expert.
My last post was about building a door in my basement. Since this was my first door, I made a few mistakes. Most of them I was able to fix or cover up. None of them involved a trip to the hospital. Here they are for your amusement.
Rails are the long, tall side pieces of the door. They're the most expensive part by lumber cost. Each of the rails needed a 1/4" groove cut along the inside to fit the center panel. I didn't have a dado set, so I made multiple passes with my table saw to get the width right.
Well, the first time I flipped the rail around, I cut into the outside instead of the inside. It only got about 4 inches along before I realized and backed it off. Damn. There goes my perfect door. Little did I know this wouldn't be close to the biggest mistake yet.
The fix: I smeared some wood filler on the mistake cut, and let it cure to sand down later. Since the door is painted, it doesn't matter if there is some wood filler instead of beautiful wood grain.To keep the groove centered, I cut one pass of the groove then flip the rail around, and cut the other side. Each time I adjusted the table saw guide, the distance I changed it would be doubled in the groove. Well, one of them I cut just a little bit too wide. When I measured it with my micrometer, it was 0.265 instead of 0.250. Even 15 thousandths of an inch difference is enough to lose a snug fit.
The fix: This time I can't use wood-filler. Cutting another rail would mean buying more wood. I decided to use this rail anyway, and re-cut the stiles with a wider tongue.
 The stiles were the most persnickety part of the door. These are the top and bottom parts. They connect the rails, and hold in the panel. They needed tongues on both sides to fit in the groove of the rail. That should be a press-fit, which means very small tolerances. Not much margin for error. They also need grooves cut for the panel to notch into. That's the same as the grooves in the rails.
First, I removed wood to reveal the tongue. When I fit these into the rails, there was a visible gap between the rails and the stile. I couldn't trim down the tongue, because the door would be too narrow. I recut some more stiles.
Cutting inside corners with a table saw is challenging. The teeth of the table saw blade don't leave a flat cut on top. Each tooth alternates which side is taller, then angle down. They leave a bit more wood in the center of their path. Following up with hand chisels, I finally got the insides of these cuts cleaned up and press-fit properly.
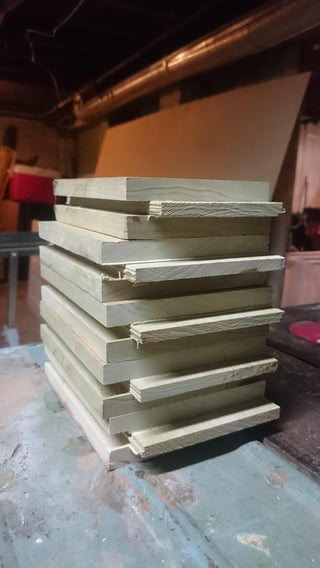
The fix: Recutting the damn things several times until they were perfect. The tongues weren't identical because one rail groove was slightly wider. Here's my stack of mistakes.
It's easy to cut a groove too wide. Surprisingly easy. It happened again on one of the stiles. Fortunately, on a piece of wood this short (6.5 inches) there was a simple solution.
The fix: Fill the groove with a block of wood. I took one of the sad stiles relegated to the mistake pile. It was already the right length. Cut a filler block to the right dimensions, add some glue, and clamp it into place. That stile became the bottom of the door. No one will see it once I hang the door.
I chalk this up to sleep deprivation. After final success test-fitting all the door pieces together, it was time to assemble the door. First, I completely dis-assemble the door. Then, glue to all the right faces, and put back together the door frame. Using a soft-mallet to get everything fitting nicely, I got ready to apply the clamps. That's when I realized I forgot to put in the center panel. D'oh! I fit those damn parts together so many times, I didn't notice something was missing at first.
The fix: Super easy since the glue wasn't dry. Take it apart, clean up the glue, and put it back together with the panel in place.
Once the door was fully assembled and the glue set, I took it upstairs for a test fit in the doorway.
It was too narrow. What the fuck. How did this happen?
Remember when I built a CAD model of the door? I added variables to be able to adjust the model for other projects. After testing that the variables worked, I didn't reset the width back to the correct number. It was two inches too narrow. Now what the hell do I do?
You can't add more wood back on, can you?
Actually, you can.
If I added a 1-inch strip to each side of the door, it would fit correctly. That would look pretty jacked-up though. Unless I added something to make these additions look deliberate. Time to get fancy. Fancy trim pieces help make the transitions look intentional.
I've written before about how simplicity is hard. To make something simple, each step must be right. One time-honored way to fix a mistake is by covering it up. That's why they make fancy trim.
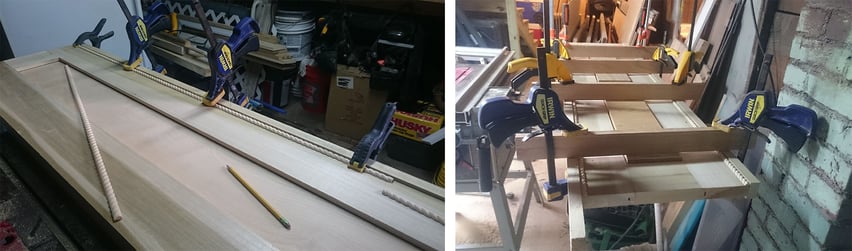
The fix: I decided to add the two inch-wide strips in deeper wood than the stiles, and make it a feature. Like architectural molding.
The door was originally 1.25 inches deep. I added new pieces of wood on the sides which were 1.75 inches deep. Between these edges I glued on some rope trim. Around the inner panel, I added some dentil molding. The hardest part of all of this was cutting the dentil molding so the notch intervals matched up in the corners. Those are the details that make the difference. See the final photos for close-ups.
Now that I covered all my mistakes, it's time to put on the hinges and mount the door. Fortunately this time it fit like a charm. The hinges needed to be in-set a little deeper than normal, to stop a tiny bit of rubbing on the left side. It's always harrowing chiseling out wood from a finished project. I worry that I'll screw something up irreparably and have to re-do the whole thing again. Good thing that didn't happen. With the door mounted, and the backstop installed on the door jams, this project is a wrap.
Here are the final shots of the door installed, close-up of the trim pieces, and a detail shot of the dentil molding lining up perfectly.

Looking for architectural photography? I can help.
Each of those shots required a different light setup.
The last one on the right, I used two different gridded flashes to create the shadows in the dentil molding.
For the middle one, I spread out the lights. One gridded beauty-dish on the left, at camera height, lit the door evenly. The hinge placed this image clearly as a door. Without the hinge, this could be any type of interior wood work. I used a smaller gridded light to highlight that part of the frame.
The last image was easiest. to light. I removed both grids, and just pointed the flash to the ceiling. All that white space made a great even fill. The geometry of the shot, and the bedroom stuff in the picture tell the rest of the story.
What mistakes have you learned from in your field or hobby?
Clouds don't belong in indoor pictures. This was taken on stage just before read more
Inspired by The Rye Baker by read more
Love it or hate it, Pokemon Go is everywhere. If you hate it, then you're probably not reading this. You also don't care how to take better pictures within ... read more
 read more
Comments